Hey everyone! I’m Lindsey Paris of Redhead Baby Mama. Thank you so much to Angela for having me today!
Over at Redhead Baby Mama, I write about my little Redhead (of course!), my work (I’m a professional costume designer and stylist), and the strange and sometimes funny things that go on in our house. I’m starting to open up a little more and share things about my personality, so drop in anytime and throw a question or comment at me – I’m in full interaction mode and you’ll always get an answer!
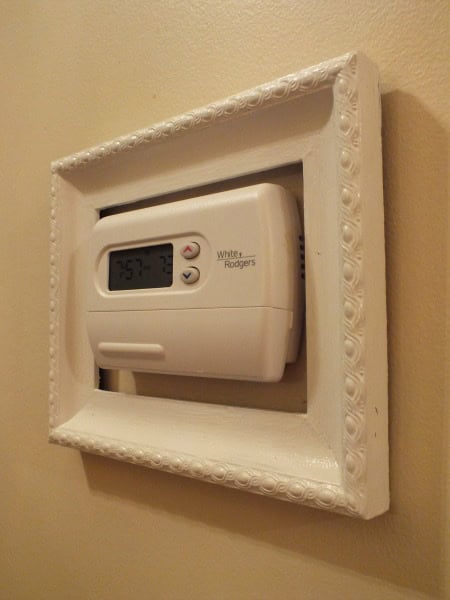
Today I’ll be sharing a quick craft to spruce up that ugly utility on your wall. That thermostat, alarm console, or triple light switch? Ugly no more! I picked up this frame from the corner store for $5. See that $12.99 price tag? No way! Coupons and sales made it so much cheaper. This frame is a 5×7, fitting nicely over our thermostat. (Measure before you hang! Check out your local goodwill to find a frame that suits your style and spruce it up).
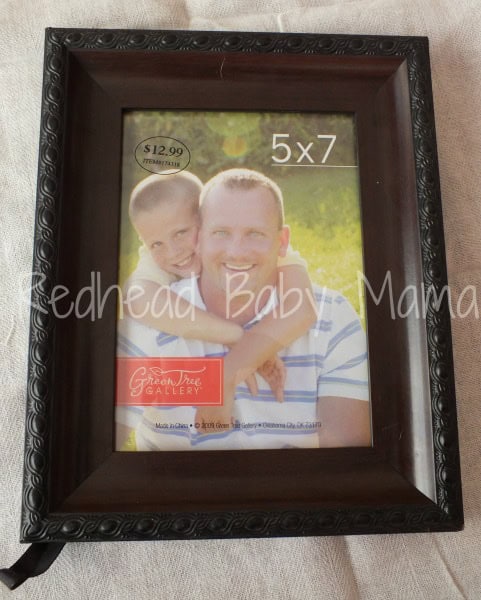
We’re in the process of painting the house, and this black/brown frame just isn’t doing it for me. Fortunately, I still have lots of leftover trim paint, so this guy is getting a coat of Valspar Jefferson Heritage White to match all the baseboards and wainscoting.
I removed the glass, inserts, etc. and started to prep the frame for paint. Using an exacto knife, I scored and removed the back panel. I made sure to keep the picture hanging thingies intact for later. (If your frame doesn’t have any, they are super cheap at a hardware store or you can command strip it to the wall) Using a sandpaper sponge for more control, I gently roughed up the surface for paint and stripping. You can do this before or after deglossing.
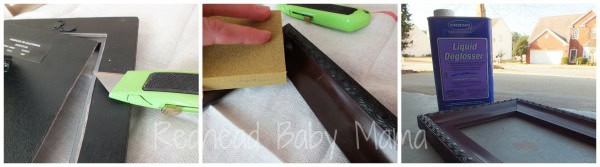
What’s deglossing, you ask? The most wonderful thing on the planet. This fume-heavy stuff will strip all the poly and glaze right off your furniture – as well as a little bit of paint. Working outside, use an old rag or LARGE wad of paper towels and gloves, rubbing the solution over your painted surface. The gloss comes right off and the surface becomes matted, bare and “thirsty” looking. Take a look at this post to see how I used deglosser to paint a chest of drawers without sanding and made it much more modern!

For the next step, use the paint of your choice (spray, latex, etc) and give the frame a good few coats, avoiding streaks, bubbles and drips. Dry thoroughly. Ger creative as you want to – Modge Podge pictures together, draw with a sharpie, dots, chevrons or the newest trend: houndstooth.
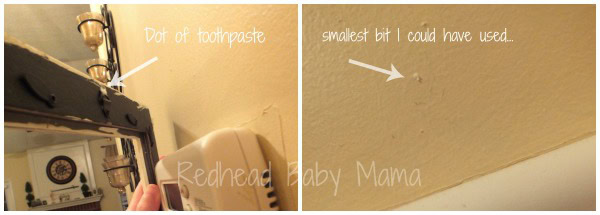
When you’ve finished your creation, mark the nail hanger with a dab of toothpaste, so you can see where to place your nail. Install, hang, and admire that very handsome wall utility!

Totally doing this. Reminds me of the friends peep hole.
totally – they were crafty before their time. Everyone that has visited said how cute it is!
Thank you, Angela – what a pleasure it was to post for you!
The pleasure was all mine. Thanks for the fabulous DIY project!
Oh yeah…our thermostat sticks out like a sore thumb…I like this idea. Thank You!
I love this idea! We have several ugly things I would like to frame with this idea!
What a neat idea!
That’s a cute idea!
such a great idea!
Such a cute fun craft!
Well… I cannot believe I’ve never thought of using a dab of toothpaste to mark where a nail or screw should go. Learn something new every day! Thanks!
Instead of covering it you make it into a work of art – fantastic!