My grandson is in a band, and my daughter-in-law recently made some band t-shirts for the family using iron-on pictures of him with his band mates. I wore my META4 t-shirt proudly at their last gig, and it got me to thinking about some of the rocked out t-shirts I used to wear – way back in the day. I don’t think there was ever a concert t-shirt that I didn’t cut up. The fringed and beaded shirts used to be so popular, so I decided to give it a whirl and whipped up this pony beaded t-shirt craft.

Before cutting up some of the band t-shirts, I made a sample using a $3 tee that I picked up from Walmart. I went with patriotic colors for this one, and made it for one of my granddaughters. I think she looks so stinkin’ cute in this shirt.
The first step is to cut off the hem from both the bottom of the t-shirt and the sleeves. Be sure to save this fabric for later use when creating the bow. Before I started cutting fringe, I turned the shirt inside out and drew a guide for how high I wanted the fringe to go. On this shirt I used a v-pattern on the bottom, with the fringe going up slightly higher on the sides. I fringed about the bottom 3-4 inches. For the sleeves I pretty much just guessed as I went along. Once you’ve marked how far in you want the fringe to go, simply start cutting strips. Each strip should be about 1/4 inch wide.

After all your fringe is cut, add the beads. This is the time consuming part. While it’s a very simple craft, the beads don’t want to go on too easily. I found that if I twisted the end of the fringe, the beads were easier to slide on. You can slide on one bead like I did, or use multiple beads. Once you’ve slid a piece of fringe through the bead, tie a knot at the end to secure it. Repeat this process for each strip of fabric.
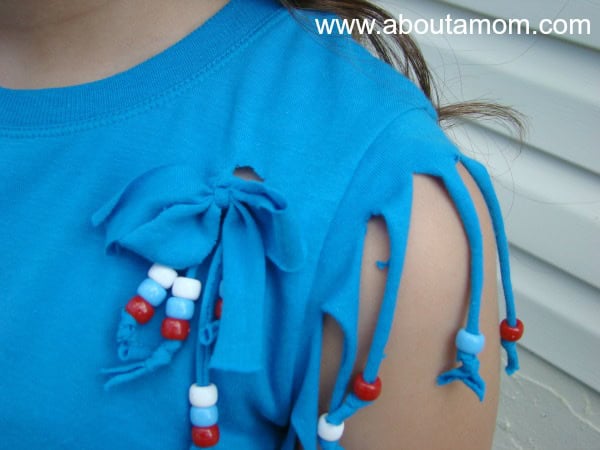
To create the ribbon and fringe on the front of the shirt, cut several strips from the reserved hem. Use one longer strip to tie a bow onto the shirt, and several to bead. Cut 2 slits into the t-shirt where you want the bow to go, then tie on the beaded strips and the bow.


That’s adorable! I love the little bow.
Great craft! I’ve made my share of these!!!
Wow, told myself I am going to have to make a few!!
My daughter would love this. We will have to try it. Thanks for sharing.
adorable, I had a shirt like this when I was younger and I LOVED it. great gift idea
This is really cute. There’s something very 80’s-ish about it – I mean that in a good way. Everything old is new again!
I remember wearing shirts like that when I was younger, cutting them up and adding pony beads. Sure brings back memories. I like the bow you added. Gives a nice touch.
Wow ~ You are such a super crafter! I just love this idea and I am already thinking that I could put an iron on transfer on the front of an indian if I can find one and my niece would go nuts. I could make a lot of these for little money. And she could make it with me! THANKS!
This came out great! I’d like to do this with some older tees, that nobody really wants or wears anymore. I love crafting, and I’ve recently started using beads – this is a good one to try!
If you want to increase your know-how only keep visiting this website
and be updated with the most up-to-date news update posted here.