I love making new things from everyday throwaways, and have been thinking about making some of these tin can lanterns for months now. When Emily from Nap-Time Creations asked Laura and I to participate in her Summer Fun Series, I knew it was the perfect time to make some. Summer break has already been so much fun for my family with a trip last weekend to Stone Mountain Park and Six Flags. Last week my nieces and I had fun making Duct Tape Tote Bags. We even made our own miniature golf course in the front yard. We’ll be sharing that project on the blog next week, so keep an eye out for it. It’s shaping up to be a fun summer, for sure!
My Tin Can Lanterns are included week 2 of the Summer Fun series, along with some other great summer fun projects.
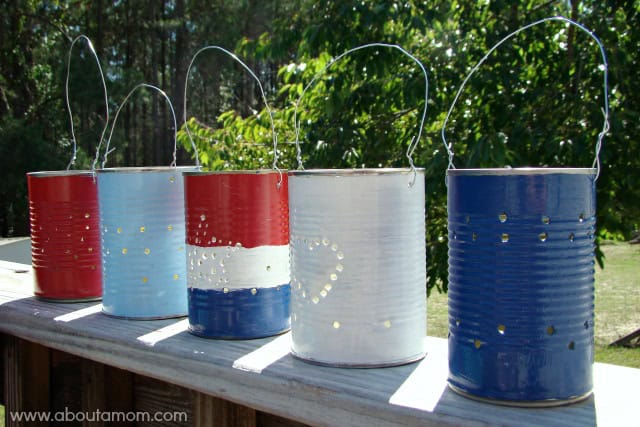
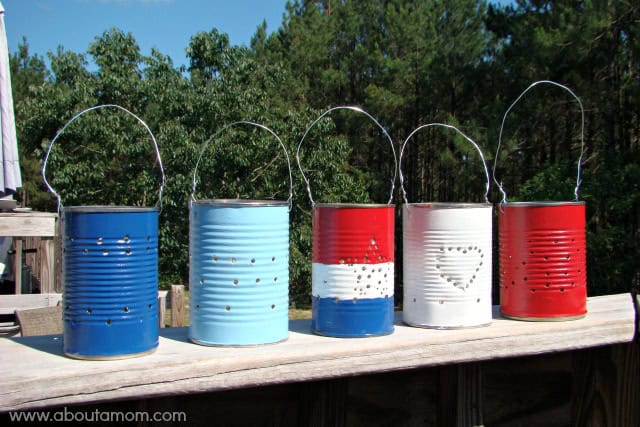
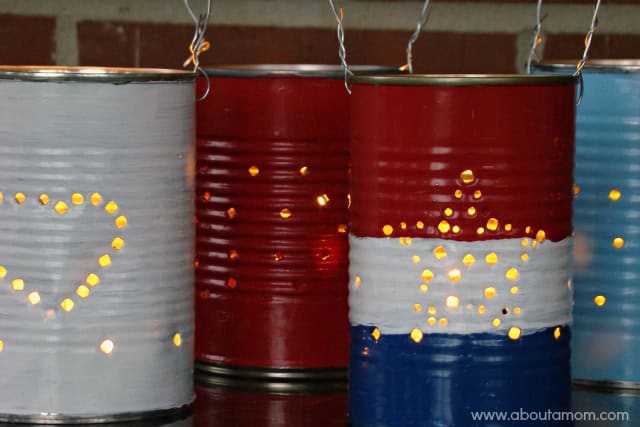
How to Make Tin Can Lanterns
These lanterns are so much fun to make and the supplies you’ll need for this project are minimal. Don’t buy any special paint for this project. We just used some acrylic craft paints that we already had, and with 4th of July coming up soon went with a red, white, and blue theme. I have to confess that my mom, Laura, ended up doing a lot of the work on these lanterns. She’s so good like that.
Supplies You’ll Need:
recycled tin cans
hammer
nail
bailing wire
pliers
craft paint
tea light candles
Step 1: Begin by washing all the cans. Remove the labels and glue from the cans. If you come across some stubborn glue, WD-40 proved to be very helpful. I first tried a Magic Eraser which turned out to not be such a good idea.
Step 2: Fill all the cans with water and place them in the freezer. Leave them in until the ice is solid, overnight should be good. This helps the can hold its shape for the next steps. You don’t want to skip this step. Trust me.
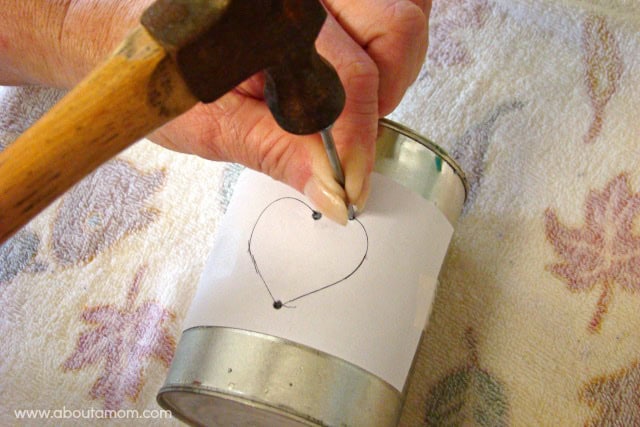
Step 3: Remove your frozen can from the freezer, and place it on a towel. You’ll want to do this a can at a time. Using a hammer and nail, pound a hole near the top of the can. Flip the can over and make another hole straight across from the first hole. These will be used to attach the handle later on.
Step 4: Make your design. I first tried making a design on paper and taping it to the can, but it didn’t stay in place very well. I ended up doing my designs freestyle. Use the hammer and nail to start punching out a design in your can. The size of your holes will vary based on the size of the nail you use. I prefer using a larger nail for this. Less work and more light will shine through.
Step 5: When you design is all finished, place the can in the sink and let the ice melt out. I’m a rather impatient person, so I cheated with a little warm water. Let the can dry completely.
Step 6: You will notice a big bulge in the bottom of the can. Don’t panic because this is supposed to happen. It comes from freezing water in it. It can easily be fixed. Simply use a hammer to pound it down flat.
Step 7: Brush some paint onto the dried cans. Allow to dry completely.
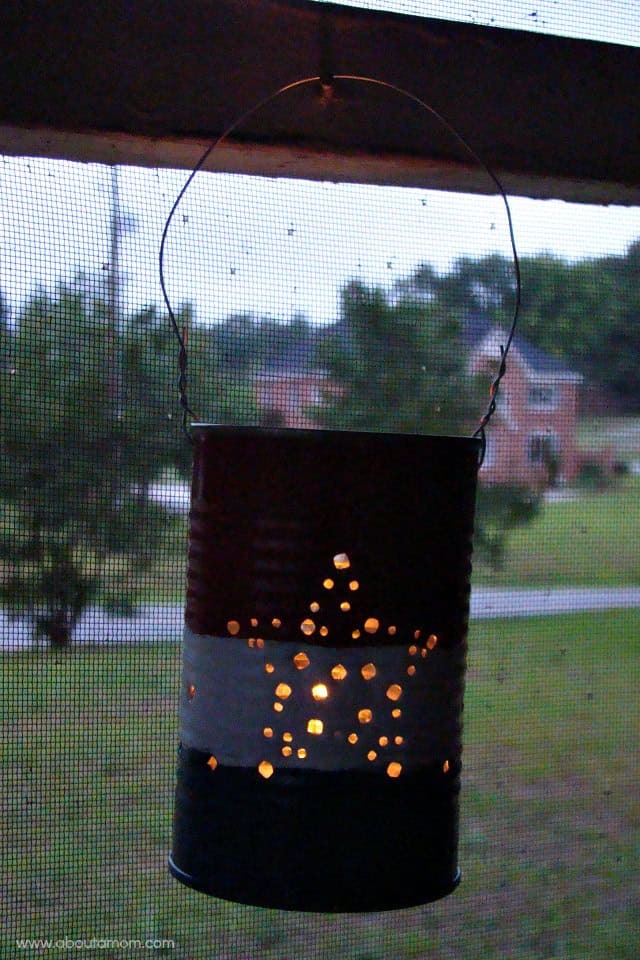
Step 8: Make a handle. Cut a 12 inch strip of bailing wire and curve the end of it to form a hook. Stick the hook through one of the top side holes. Twist the hook around to secure it. Make a hook on the other end of the wire. Stick it in the side hole on the other side and twist it around. Easy peasy!
Step 9: Insert tea light candles and light them up.
It’s the glow of summer.
I love how they light up the screened porch on a rainy evening – something we’ve been having a lot of lately.

Wow, these look really cool! I will have to try this for the 4th of July!
What a clever idea. I like that they are easy to make, and you can use items you already have at home. Thanks for shAring.
Super cute! I have a Costco membership, so we wind up with a lot of huge cans and it seems like a lot of metal to throw away! I’m pinning this 😉
This is a different and fun project . Thanks for the easy directions and the tip about WD-40
These look like so much fun! I wish I lived in a house, instead of an apartment. I’d have these on a proch, a patio, lining the driveway….I guess you could customize these for any, occasion, too!
I want to do a bunch of these, I would never thought of freezing the cans, that is simply genius.
I have my cans all ready to go in the freezer. Your blog has the best steps, by far, to point us in the right direction to come up with some beautiful summer upcycled lanterns. xo
what a cute idea, and what a great idea to freeze them with water to keep them strong while hammering the holes in them. i wanna hang a bunch around the yard in my trees, so cute 😀
These are so fun! Thank you for sharing this craft with us.
I just realised I can use led tealights in these for the fall! This will be great out in the front to keep the front porch decorated as the leaves change and fall sets in.