• Skip to primary navigation
  • Skip to main content
  • Skip to primary sidebar

About a Mom

Inspiration for Motherhood

  • What’s for Dinner
    • Main Course
    • Pasta
    • Chicken
    • Casseroles
    • Vegetarian
    • Slow Cooker Recipes
    • Keto
  • Sides & Snacks
    • Salads & Side Dishes
    • Snacks
    • Appetizers
  • Sweet Treats
    • Dessert
    • Baking
    • Cookies
  • Kids Corner
    • Crafts for Kids
    • Kids Fun
    • Activities
    • Learning Activities
    • Food for Kids
  • Mealtime
  • Printables
  • Crafts
  • parenting
  • Low Carb Recipes
  • Most Loved
  • About
HomeFamily FunCrafts

DIY Garden Bird Bath Project

Angela SellariBy Angela Sellari
Angela Sellari
Angela Sellari Founder of AboutAMom

Angela is the founder of About A Mom and currently acts as a content creator and editor-in-chief for the About A Mom Team. She has been a professional blogger for over 10 years. Angela has appeared…

Expertise: Content Creation & Editing View all posts →

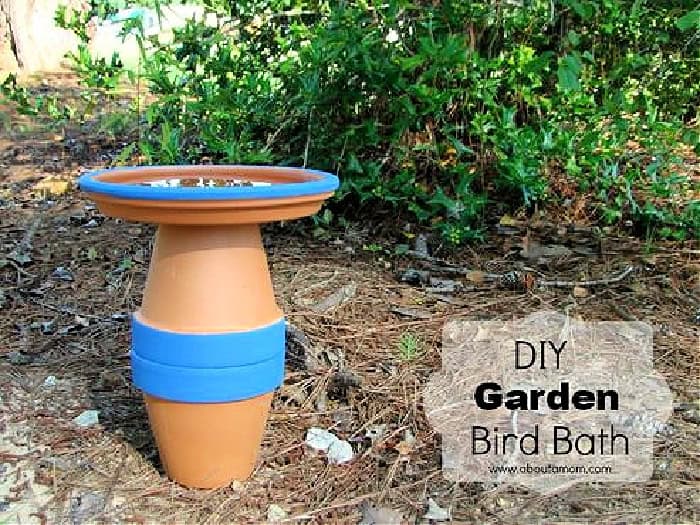
This DIY Bird Bath is such an easy and fun backyard garden project. All you need is a couple of terra cotta pots, a saucer and an epoxy adhesive.

How to Make a DIY Bird Bath

My yard is a popular place for birds, squirrels and all sort of wild creatures.  I’ve been wanting to give the birds living in my yard a water source for a while now, but I wasn’t finding quite the right one. My solution was this simple DIY Bird Bath.

DIY Garden Bird Bath

Materials Needed

2 large terra cotta pots of equal size

1 large terra cotta saucer

epoxy glue adhesive

paint and paint brush (optional)

How to Make a Bird Bath

1. To create the base of the bird bath, glue the open ends of the terra cotta pots together. Allow to set, according to the directions on your adhesive.

2. Glue the bottom of the saucer to the top of your base. Allow to set completely.

3. At this point you are finished with your project. Optionally, you can do as I have and add some decorative paint. I put a simple band of paint around the rim of the saucer. Because my epoxy seeped through a little when I glued my pots together, I added another band of paint to cover that up.

4. Place the bird bath in your yard, add water as needed, and enjoy watching the wild life in your yard thrive.

About Angela SellariContent Creation & Editing

Angela is the founder of About A Mom and currently acts as a content creator and editor-in-chief for the About A Mom Team. She has been a professional blogger for over 10 years. Angela has appeared in numerous TV segments, advertising campaigns and her work has been featured by many top publications. She lives in Tampa, Florida.

Reader Interactions

Published: Jun 13, 2013 | Updated: Oct 7, 2025

Leave a Comment Cancel reply

Have a question? Use the form below to submit your question or comment. I love hearing from you and seeing what you made!

Recipe Rating


  1. Dina@Kitchen Dreaming says

    Posted on 6/13 at 6:31 PM

    Thanks for coming and linking up at The Weekend Social. Please be sure to come back next week starting Thursdays at 9PM EST on KitchenDreaming.com ! I hope to see you there!

    Reply
  2. Billie says

    Posted on 6/27 at 8:37 PM

    This is such a great project. I had a bird feeder up, but they went through the food so fast!

    Reply
  3. Rachel says

    Posted on 6/28 at 2:48 AM

    This is such a cute idea! I’m definitely going to have to show this to my grandmother. She’s the gardener of the family (I fail miserably), and is always looking for stuff like this for the local Garden Club!

    Reply
  4. Lesa says

    Posted on 6/28 at 9:18 PM

    This is really cute, and looks like something I could actually do! Probably can get these at the Dollar Store! Thanks for a great idea again!

    Reply
  5. Shannon says

    Posted on 6/29 at 9:25 AM

    What a fun birdbath. Thank you for sharing this project with us.

    Reply
  6. Tina R. says

    Posted on 6/29 at 12:37 PM

    Such a simple and easy project! I think I need a few for my yard!!

    Reply
  7. linda moore says

    Posted on 7/5 at 7:59 AM

    so easy to make and looks like you spent a lot of money.Thanks for the post!

    Reply
  8. Carolann Leibenguth says

    Posted on 7/5 at 10:27 AM

    I love this project this will be a great project to do with my stepson. Whenever I am at a loss for activities I can always count on you.

    Reply
  9. PAULA v says

    Posted on 7/8 at 9:37 AM

    Wow…this is really neat. I had to look twice to see what it was….It would be much cheaper than a purchased bird bath. I’m all about DIY projects.

    Reply
  10. Kelly Tupick says

    Posted on 7/10 at 2:26 PM

    This is such a creative and simple idea. I love how it all works. I am going to have to make one of these.

    Reply
Older Comments
Newer Comments
DIY Oven Baked Clay Beads
Previous Post
Summertime Crafts: DIY Oven Baked Clay Beads
Ribbon Flip Flops Craft
Next Post
DIY Ribbon Flip Flops

Primary Sidebar

  • About
  • Contact

Join The Club

Subscribe for inspiration straight to your inbox!

Sign Up

Let's Connect

Back to Top
  • Contact
  • About
  • Privacy
  • Terms
About A Mom is part of Waywith.