• Skip to primary navigation
  • Skip to main content
  • Skip to primary sidebar

About a Mom

Inspiration for Motherhood

  • What’s for Dinner
    • Main Course
    • Pasta
    • Chicken
    • Casseroles
    • Vegetarian
    • Slow Cooker Recipes
    • Keto
  • Sides & Snacks
    • Salads & Side Dishes
    • Snacks
    • Appetizers
  • Sweet Treats
    • Dessert
    • Baking
    • Cookies
  • Kids Corner
    • Crafts for Kids
    • Kids Fun
    • Activities
    • Learning Activities
    • Food for Kids
  • Mealtime
  • Printables
  • Crafts
  • parenting
  • Low Carb Recipes
  • Most Loved
  • About
HomeFamily FunCrafts

DIY Garden Bird Bath Project

Angela SellariBy Angela Sellari
Angela Sellari
Angela Sellari Founder of AboutAMom

Angela is the founder of About A Mom and currently acts as a content creator and editor-in-chief for the About A Mom Team. She has been a professional blogger for over 10 years. Angela has appeared…

Expertise: Content Creation & Editing View all posts →

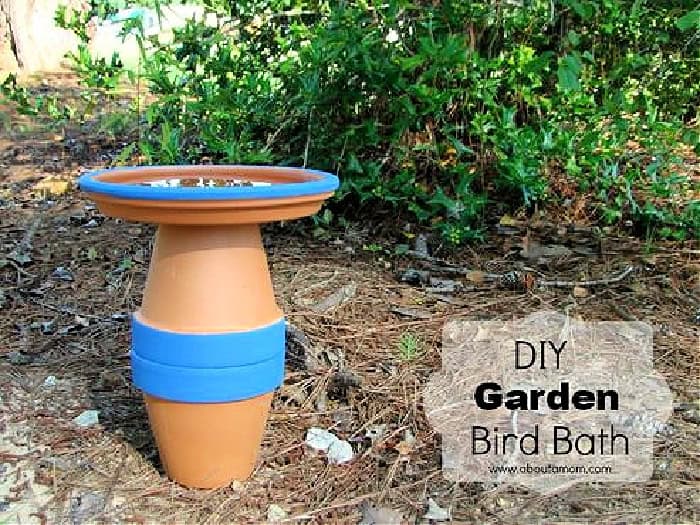
This DIY Bird Bath is such an easy and fun backyard garden project. All you need is a couple of terra cotta pots, a saucer and an epoxy adhesive.

How to Make a DIY Bird Bath

My yard is a popular place for birds, squirrels and all sort of wild creatures.  I’ve been wanting to give the birds living in my yard a water source for a while now, but I wasn’t finding quite the right one. My solution was this simple DIY Bird Bath.

DIY Garden Bird Bath

Materials Needed

2 large terra cotta pots of equal size

1 large terra cotta saucer

epoxy glue adhesive

paint and paint brush (optional)

How to Make a Bird Bath

1. To create the base of the bird bath, glue the open ends of the terra cotta pots together. Allow to set, according to the directions on your adhesive.

2. Glue the bottom of the saucer to the top of your base. Allow to set completely.

3. At this point you are finished with your project. Optionally, you can do as I have and add some decorative paint. I put a simple band of paint around the rim of the saucer. Because my epoxy seeped through a little when I glued my pots together, I added another band of paint to cover that up.

4. Place the bird bath in your yard, add water as needed, and enjoy watching the wild life in your yard thrive.

About Angela SellariContent Creation & Editing

Angela is the founder of About A Mom and currently acts as a content creator and editor-in-chief for the About A Mom Team. She has been a professional blogger for over 10 years. Angela has appeared in numerous TV segments, advertising campaigns and her work has been featured by many top publications. She lives in Tampa, Florida.

Reader Interactions

Published: Jun 13, 2013 | Updated: Oct 7, 2025

Leave a Comment Cancel reply

Have a question? Use the form below to submit your question or comment. I love hearing from you and seeing what you made!

Recipe Rating


  1. Rachel Beltz says

    Posted on 7/14 at 11:49 PM

    This is such a cute idea! I bet that the hot birds would love to see this in our yard!

    Reply
  2. Jennifer Curtiss says

    Posted on 3/6 at 6:36 PM

    Love love love this idea. This would be a great project to work on with my girls and not to mention it would look great in our backyard!!

    Reply
  3. Cynthia L says

    Posted on 4/6 at 11:18 AM

    Love this! Easy and frugal way to decorate the yard and to bring the birds!

    Reply
  4. Cathy says

    Posted on 4/6 at 2:03 PM

    What a great way to have a bird bath without the expense. I love using terra cotta pots for all sorts of projects. Thank you so much for sharing at Share It One More Time. Cathy

    Reply
  5. Suzie@homemaker-mom says

    Posted on 4/7 at 10:31 PM

    This is down right awesome. Thank you for sharing at the Wake Up Wed….link up! Visit me anytime. I love your blog!

    Reply
  6. Linda Bauwin says

    Posted on 4/8 at 6:34 AM

    Very clever need to give a try
    Linda Bauwin – CARD-iologist
    Helping you create cards from the heart

    Reply
  7. April says

    Posted on 4/10 at 9:30 AM

    I LOVE this bird bath! It’s unique and pretty, and would look so nice next to my flowers. I found you on Pinworthy Projects and would like to invite you to share this recipe with us at our Friday Frenzy party too. – Angels Homestead

    Reply
    • April says

      Posted on 4/10 at 9:33 AM

      Sorry about that, I meant to say craft, not recipe! lol

      Reply
  8. Amy @ Ms. Toody Goo Shoes says

    Posted on 4/11 at 12:05 AM

    So cute! Thanks for linking up with Best of the Weekend!

    Reply
  9. Janice Wald says

    Posted on 4/12 at 6:43 PM

    How fun. We have a bird feeder. Thanks for coming to the Inspire Me Linky Party on Monday. I’m Janice, one of your hostesses.

    Reply
  10. Megin says

    Posted on 5/15 at 11:34 AM

    Thank you for sharing your post recently at Brag About It Link Party on VMG206. I’m hosting a Series in June “30 Days of Summer” and I ‘d love to feature you!
    To participate, please email me your post (with an introduction and link back to your site) at vmg206 at gmail. I hope you join us!
    ~ Megin of VMG206

    Reply
Older Comments
Newer Comments
DIY Oven Baked Clay Beads
Previous Post
Summertime Crafts: DIY Oven Baked Clay Beads
Ribbon Flip Flops Craft
Next Post
DIY Ribbon Flip Flops

Primary Sidebar

  • About
  • Contact

Join The Club

Subscribe for inspiration straight to your inbox!

Sign Up

Let's Connect

Back to Top
  • Contact
  • About
  • Privacy
  • Terms
About A Mom is part of Waywith.